1. 简介

Koa 是一个新的 web 框架,由 Express 幕后的原班人马打造, 致力于成为 web 应用和 API 开发领域中的一个更小、更富有表现力、更健壮的基石。 通过利用 async 函数,Koa 帮你丢弃回调函数,并有力地增强错误处理。 Koa 并没有捆绑任何中间件, 而是提供了一套优雅的方法,帮助您快速而愉快地编写服务端应用程序。
2. 创建 Koa 应用
第一步:安装 koa
npm install koa第二步:创建服务
const Koa = require('koa')
const app = new Koa()

app.use(async ctx => {
  ctx.body = 'Hello koa'
})

app.listen(3000, () => {
  console.log('Example app listening on port 3000')
})
3. 上下文(Context)
Koa Context 将 node 的 request 和 response 对象封装到单个对象中,为编写 Web 应用程序和 API 提供了许多有用的方法。
每个请求都将创建一个 Context,并在中间件中作为接收器引用,或者 ctx 标识符,如以下代码片段所示:
app.use(async ctx => {
  ctx // 这是 Context
  ctx.request // 这是 koa Request
  ctx.response // 这是 koa Response

  ctx.req //Node 原生的 request 对象
	ctx.res //Node 原生的 response 对象
})
代理别名
- 为方便起见许多上下文的访问器和方法直接委托给它们的
ctx.request或ctx.response ctx.path和ctx.method委托给request对象。ctx.type和ctx.length委托给response对象。
以下访问器和 Request 别名等效:
ctx.headers // 与 ctx.request.headers 相同
ctx.method
ctx.url
ctx.query
以下访问器和 Response 别名等效:
ctx.body  // 与 ctx.response.body 相同
ctx.status
ctx.type
ctx.length4. 路由
Koa自身并不直接提供路由功能,在Koa框架中,路由通常是通过引入外部路由中间件来实现的,其中@koa/router是一个广泛使用的路由中间件。
4.1 基本使用
第一步:安装 @koa/router
npm install @koa/router第二步:引入并创建路由
const Router = require('@koa/router')
const router = new Router()

// 定义一个GET路由
router.get('/', async (ctx, next) => {
  ctx.body = 'Hello World!'
})

// 将路由应用到app上
app.use(router.routes()).use(router.allowedMethods())
/*
 1. router.routes()用于处理实际的路由逻辑
 2. router.allowedMethods()用于处理HTTP方法(如GET、POST等)的允许性检查,并自动处理405 Method Not Allowed响应。
*/
4.2 路由参数与重定向
@koa/router还支持路由参数,这允许你捕获URL片段并将其作为参数传递给路由处理函数。
// 捕获参数
router.get('/user/:id', async (ctx, next) => {
  const id = ctx.params.id
  ctx.body = `User ID is: ${id}`
})

// 重定向
router.get('/user', async (ctx, next) => {
  ctx.redirect('/login')
})
4.3 路由前缀
const router = new Router({ prefix: '/admin' }) // 设置路由前缀

router.get('/', async (ctx, next) => {
  ctx.body = 'admin Home Page'
})

router.get('/about', async (ctx, next) => {
  ctx.body = 'admin About Page'
})

app.use(router.routes()).use(router.allowedMethods())
4.4 路由模块化
- 创建 homeRouter.js 文件
const Router = require('@koa/router')

const router = new Router({ prefix: '/home' }) // 设置路由前缀

// 路由: /home
router.get('/', async (ctx, next) => {
  ctx.body = 'home Page'
})

// 路由: /home/about
router.get('/about', async (ctx, next) => {
  ctx.body = 'home About Page'
})

module.exports = router- 引入路由模块到主应用
const Koa = require('koa')
const homeRouter = require('./routes/homeRouter') // 引入路由文件
const app = new Koa()

// 注册主页路由
app.use(homeRouter.routes()).use(homeRouter.allowedMethods())

app.listen(3000, () => {
  console.log('Example app listening on port 3000')
})
4.5 路由嵌套
主要是通过在一个Router实例内部创建并使用或引用另一个Router实例来完成的。
const adminRouter = new Router({ prefix: '/admin' });

adminRouter.get('/', async (ctx, next) => {
  ctx.body = 'Admin Home';
});

adminRouter.get('/profile', async (ctx, next) => {
  ctx.body = 'Admin Profile';
});

// 将嵌套路由应用到主路由上
router.use(adminRouter.routes()).use(adminRouter.allowedMethods())
5. 静态资源托管
在Koa中,你可以使用koa-static或koa-static-server等中间件来实现静态资源托管。这些中间件允许你指定一个目录,Koa服务器将从这个目录中提供静态文件(如HTML、CSS、JavaScript、图片等)给客户端。
第一步:安装 koa-static
npm install koa-static第二步:引入并使用
const serve = require('koa-static') // 引入

app.use(serve('./public')) // 配置静态资源位置
小提示
配置静态资源路径时,不建议使用相对路径,可以使用path模块动态生成绝对路径
const path = require('path')

app.use(serve(path.resolve(__dirname, './public')))
6. 中间件执行栈(洋葱模型)
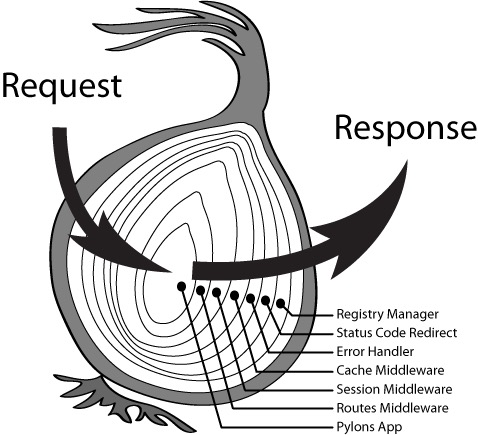
在 Koa 中,中间件的执行流程可以形象地比作剥洋葱的过程,在代码的底层实现中是用递归来实现的,Koa 的中间件机制采用了一种被称为“洋葱模型”的设计模式。

洋葱模型的特点是中间件的执行分为两个阶段:
- 入栈阶段:当请求到达时,中间件按照它们在应用中注册的顺序依次执行。每个中间件都有机会处理请求,如果它不打算阻止请求的传递,它会调用
next()函数,将控制权交给下一个中间件。 - 出栈阶段:一旦所有的中间件都通过
next()调用完成入栈阶段的执行,控制流开始回溯,即从最内部的中间件开始向外部返回。在这个阶段,中间件可以处理响应或进行任何清理操作。
const Koa = require('koa')
const app = new Koa()

const one = async ( ctx, next) => {
  console.log('>> one start')
  await next()
  console.log('<< one end')
}

const two = async (ctx, next) => {
  console.log('>> two start')
  await next()
  console.log('<< two end')
}

const three = async (ctx, next) => {
  console.log('>> three start')
  await next()
  console.log('<< three end')
}

app.use(one)
app.use(two)
app.use(three)

app.listen(3000, () => {
  console.log('Example app listening on port 3000')
})
输入结果如下:
>> one start
>> two start
>> three start
<< three end
<< two end
<< one end